Monday, March 27, 2017

Lock Stock and Tiller


Here I am, down for the count, getting my rest and fluids and making no progress on the boat, thanks to these guys:


Strep throat.  First time I remember having it. Oh well.

 Anyway, it has given me some time to ponder on what kind of tiller locking mechanism I will use.  Too early to think about stuff like that?  Well, not really, since everything hinges on everything else and you can make things easier on yourself by thinking ahead, even to the final stages.    

So what kind of mechanism should I use?  The old boat had a rope tiller tamer that I made myself.  It worked really well.  On the new boat it would look something like this:


Rope tiller System

Pros- Fairly easy to make, works OK. 

Cons- Moans and groans and wears the rope out. 

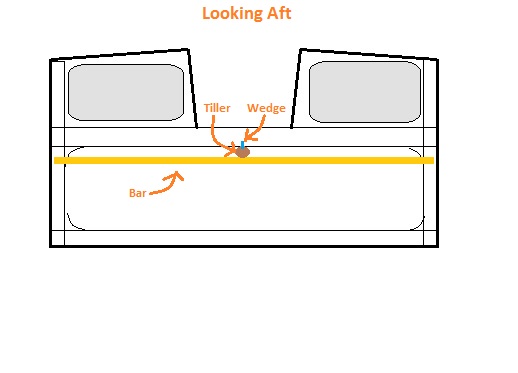
Something else that occurs to me is a wedge system.   First you make a wooden wedge with a finger hole in it like this:

Wedge
Then, you cut a groove in the tiller for the wedge to ride in like this:

You attach a fixed bar just under the tiller so that when you want to lock the tiller, you introduce the wedge into the groove and hammer it in with the palm of your hand, forcing it down against the bar (or up, if you groove the bottom) and jamming it in place. 


Pros- easy to make. would probably work ok.

Cons- you have to keep up with the wedge.


Then there is any number of ways to make the bar moveable so that it pinches the tiller against the wood above it.  Such as:


Cams or wedges that independently lift the ends of the bar.


Very Fiddly.   This would work but I'm not about to try it.


 You could lift the bar from the middle with one stick that you jam in.

This is another type of super-simple lock that would be too fiddly to use, but it occurred to me.  


   Here is another one.  You draw the bar up against the tiller with a cable or rope that runs on two pulleys.  There would be lots of ways to tighten it.


This would have too many parts to break, I think.


All in all, I'm leaning toward just going with the rope again or maybe experimenting with the inset wedge.  

If anyone reading this has any input on this, please leave a comment!

Friday, March 24, 2017

More surfaces


I have been derelict in picture taking lately, so there is not much to see.   We got the starboard side on, as well as the aftermost bulkhead.   Here is Camila on that bulkhead playing "Macdonalds Drive Thru"  


 You can see the plywood that will form the bottom of the aft part of the boat sticking out. I Then put plywood on the curved part of the bottom. You can sort of see it n this picture.


 You can also see the stringers I put on to support the deck.  Being so inexperienced in wooden boat construction, I was worried these 1.5" square sticks would be too weak over a 4 foot span.  After all, I can support any of these on the ends and snap it by stepping on the middle.  However, when I dry fitted the deck and jumped on it, the whole assembly felt very strong. Glued and screwed, it should feel even more so.  I guess I am thinking in terms of house building. When you build a house floor, any one of the floor joists will support your weight without even flexing much.  But then nobody complains about houses being too heavy, do they? 


   For the bottom pieces, I sought to pre-bend the plywood. I don't know if this was necessary.  In any case, it didn't cost anything or take much time.   I tied them up over a strong-back so they would bend, but just in one axis.


Then I stood it (well braced) by the stove so the concave side could dry while my lab assistant, I-gor, misted down the convex side. 

The bent sheet of plywood will go inserted into the slot you see here and that half sheet of plywood that is hanging there like a great lolling tongue, will be bent up over it.  


I also cut out the window holes, which is very uplifting and gives a fine sense of what it will feel like when it is done.


Monday, March 13, 2017

Now in 3-D!


Remember Flat Stanley?  He existed in only two dimensions.  That's what the boat has been like up to this point. Flat sides, flat bulkheads, flat bottom. Going to "work on the boat" just meant to make these 2-D pieces. Well, after this weekend, there is "a boat" to work on.  But first.....  flipping that bottom over.

I wanted to take advantage of the bottom being up and round off the edges.

Just kidding!  I would never let a 3 year old use a router!!


I started by hoiking it up onto its side with Dad's chain hoist.


Then I built a crib to set it on and lowered it down onto that.


To draw it over onto the blocks, I had to use a handy-billy.  I doubt it weighs much less than 400lbs.


Also had to pull it back a bit.

Then, I discovered a boo-boo.  I had used 1" drywall screws to pull the sheets together, then took them out before I sheathed the bottom.   Looks like I missed some.  Some metal detector work narrowed it down to five screws.

 I don't know how bad this really is.  One would assume they will eventually rust and cause nail sickness in the wood. I took a 5mm socket (how often do you use 5mm?) and filed teeth onto the ratchet end, chucked it up in the drill,...


 and drilled out the offending screws. 


 Ground back the dynel a bit around the holes

Then I made a dowel to fit and plugged the holes up with plenty of epoxy and re-sheathed over them.


Good as new?  I dunno. Was this necessary?  I dunno.   I had half a mind to call an expert, but it felt like one of those situations with various wrong answers and no right ones (besides prevention), so I just went for it. 


OK, here comes the 3-D part.  I hoisted up the mid-bulkhead  (they don't call it a handy-billy for nothin')


Then the forward one.

  The aft bulkhead doesn't actually sit on the deadflat, so it will be hung on the sides and the bottom will come up to greet it rather than it resting on the bottom, so it doesn't go in yet.

  Ale and I were too busy wrestling this side into position to take any pictures,  It was a lot of work. 


   There it is.   We have a bit of a boat to look at. 

Tuesday, March 7, 2017

Bottom and Rudder


  Sides and bulkheads done, time to laminate up the bottom.  Had  a real dilemma about whether to go with titebond 3 or LPU for my laminating.  I'm sure the Titebond would have done it, but I'm really afraid of not being able to get the plywood snug enough, so I ordered some off-brand Gorilla Glue, which expands and therefore is more forgiving of what Dave Z. calls "gap-osis."


  While I waited for it to come in, I used the time to make the rudder stock. Here are the cut out pieces.


  This finishes out to 1 1/2" which felt nice and beefy.  Next I Glued up three more pieces for the rudder itself.


Rudder before shaping

I did all the shaping with various planes, except the part near the top, on which I used an old farrier's rasp I got from my dad. 


Belt Sanders???   We don't need no stinking belt sanders!!
   I followed Michalak's 7% of submerged surface area suggestion for a sink-weight cutout.

  Here you see it with a metal plate clamped to the bottom and the center rabbeted out with a router.  After I did it, I realized it would have been better to round off the outsides  instead of setting in a rabbet, but whatever.  


  It takes a LOT of tire weights to fill a cylinder 6" by  1.5"  Melted them in an old tea pot.  


This was my first time pouring lead into wood.   Didn't char the wood the way I thought it would.  


  Once it cooled, I lifted it and decided that 1.5" for the rudder may be TOO beefy.  Rudder, stock, and hardware are going to weigh like an outboard!  Probably that's normal for this size range of boat.  God knows the rudder and cheeks for my old boat weighed like a pig.


    With the glue in, I started lamming up the bottom.  Started with the deadflat section, bottom-side-up on the floor. 


Then I glued the second layer onto it and rolled out the dynel I want to sheath it in. This will provide at least a little protection against abrasion. 


  I looked up the resin coverage for 5 oz. dynel, which is hard to get a good number on.  Sounded like I could need as much as 3 gallons,  I couldn't stomach buying another 3 gallons of epoxy, so I went with good old stinky polyester.


  This is the cheapest resin that US composites sells.  Just fine for this purpose.   

I had never worked such a large, flat area before.  I soon found that my old had glue spreader was not going to cut it.   The paint roller I had wasn't working.  In desperation, I ran into the house and did something I'm not proud of.   I stole my wife's squeegee. The one we mop the floor with. The one we brought back with us from Uruguay in 2004. I used it to spread nasty resin on the boat.  Worked soooooo nice, though.  I would suggest this tool to anybody.

Sorry, Honey!!!


 Here it is all sheathed.  The only regret I had was not thickening some resin and puttying the holes left by the removed screws.  Thought they would just "fill up" when I put resin over them, but they ended up as divots to fill- under the dynel.  I poked holes in the dynel with a nail and my shop hand went behind me with thickened epoxy in a syringe. 

Child labor.....   so sad.